Sharing Node-RED flow of image recognition application on GitHub
Image recognition technologies have been widely used in industrial use cases such as surveillance and factory assembly inspection. Since the state-of-the-art production lines have already adopted Node-RED to retrieve sensor data and send them to the cloud database, factory engineers will be able to implement an additional flow using image recognition quickly. To explain the procedures of Git integration, this article will use an image recognition application using TensorFlow.js. This application provides the user interface to take an image from the web camera and then display the object name of a recognized object in the image. When it displays the result, it also displays the annotated image on the same user interface.
In this step-by-step tutorial, the Git integration feature is used to manage the flow of the application. Using this feature, flow developers not only back up their flow to the GitHub repository but also share their artifacts with other flow developers with developer-friendly documentation and required module information.
Creating a new project
First, please check if your PC has a Node-RED environment with Git integration. If you don’t have the environment, install Node-RED and Git, and then enable Git integration using the following official documents (The Git integration feature is called “project feature” in the official document).
- Installing Node-RED: https://nodered.org/docs/getting-started/local
- Enabling Git integration: https://nodered.org/docs/user-guide/projects/#enabling-projects
The first step is to create a new project for the application in your Node-RED flow editor. If this is your first time using the flow editor with the Git integration feature, the Git integration wizard will appear. To display the project dialog, click the “Open existing project” at the bottom of the wizard.

If this isn’t your first time using Git integration, you can open the Projects dialog from the top right menu -> Projects -> New.

In the Projects dialog, select “Create Project” from the three items at the top of the dialog, and then enter the following:

- Project name: tensorflowjs-app
- Description: Image recognition application using TensorFlow.js
- Flow file: flows.json
- Credentials: Disable encryption
Click the “Create Project” button at the bottom of the dialog.
In later steps, we will use a private repository protected by GitHub authentication. Therefore, the encryption of credentials by Node-RED is not mandatory.
Installing required node modules
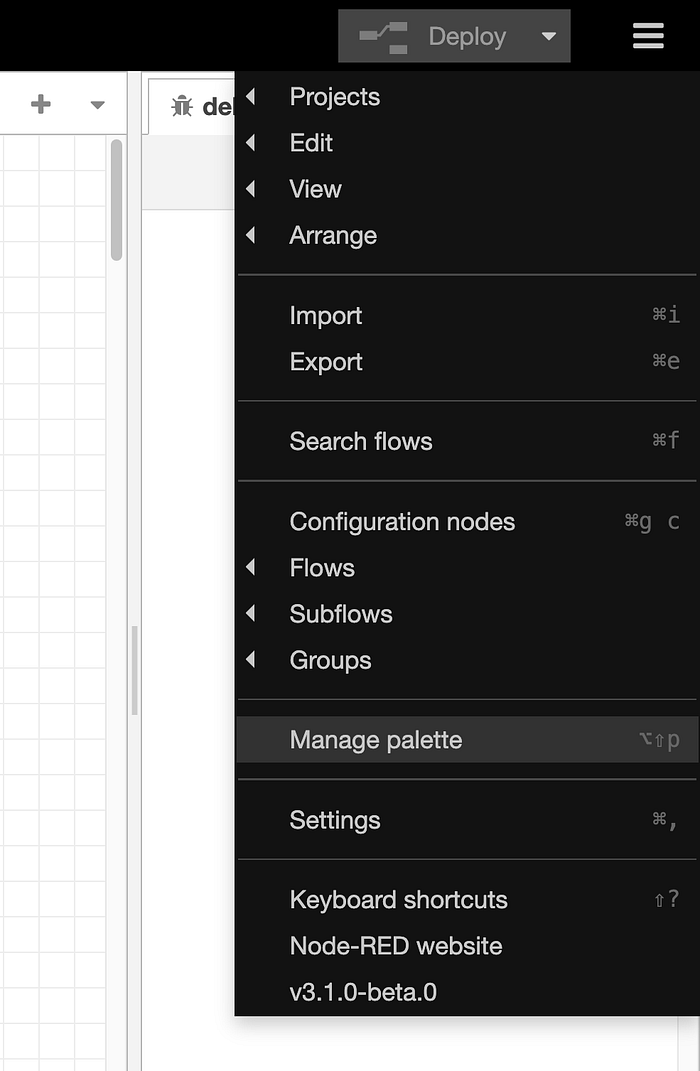
Before creating an application flow, you need to install three additional node modules in advance. To move the installation interface for 3rd party node modules, select “Manage palette” from the menu.
And then select the “Install” tab in the User Settings. The next step is to search for each node module by name in the “search modules” text input area and then click the “Install” button.
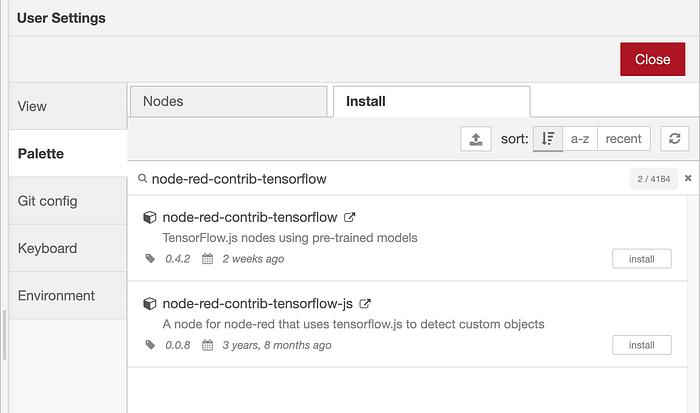
- node-red-contrib-tensorflow: A collection of TensorFlow.js nodes that extract metadata from images
- node-red-dashboard: UI nodes for outputting UI components to the dashboard
- node-red-node-ui-webcam: Dashboard UI node for taking an image from the web camera
After installing these nodes on Node-RED, the following nodes will appear in the left palette area.
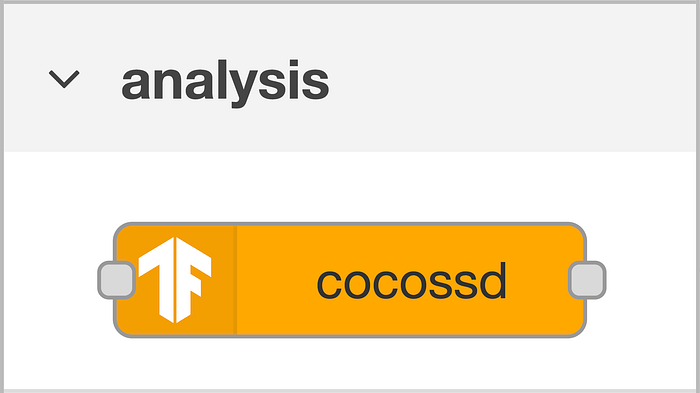

In the flow development, we will use the cocossd node to detect an object in the image data, the text node to display the specified text on the dashboard, and the webcam node to take a picture on the dashboard.
Creating a Node-RED flow
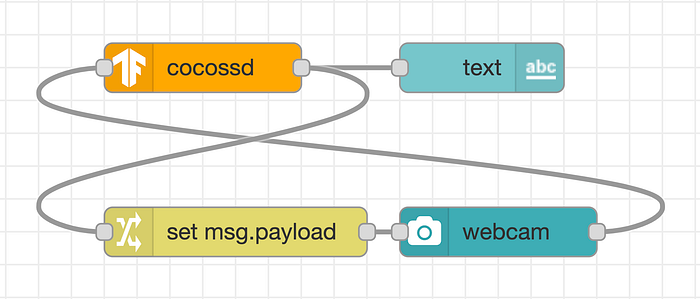
Let’s start by creating a new flow on the main canvas. Pick the webcam node, the cocossd node, and the text node from the palette. Place the webcam node under the text node as shown in the screenshot because the change node will later be added to the loop wiring under the cocossd node.

After connecting these nodes in sequence, the webcam node and the text node require dashboard grouping settings. First, open the text node’s property.

On the node property UI, replace the default “text” in the label section with “result”. Next, click the pencil button next to the “Add new dashboard group…” pull-down menu of the Group section. In the configuration node UI of the dashboard group, uncheck the “Display group name” to prevent displaying an unnecessary group name for the dashboard UI.

And then click the pencil button again next to the “Add new dashboard tab…” pull-down menu of the Tab section. After that, you can see the dashboard tab node UI as follows.

Change the “Home” in the name field to “Image recognition application”, which will be used as the title on the dashboard UI. And click the “Add” button at the top right of the tab configuration node property UI, and the “Update” button at the top right of both the dashboard group and text node property UIs twice. Currently, the dashboard settings are applied to the text node. Therefore, the webcam node doesn’t require the same procedures, just open the node property UI of the webcam node and then click the “Done” button using the existing dashboard setting for the group section.

Checking behaviors on the dashboard UI
After deploying the flow using the “Deploy” button in the upper right corner, access the dashboard UI using the URL “http://localhost:1880/ui". The dashboard UI consists of the upper camera UI component and a lower text area component that displays the result of the image recognition process. After enabling the camera function in your browser, you can see your face on the camera UI component. By clicking the camera icon button in the lower right corner of the camera UI, the web camera takes a photo and sends the image data to the cocossd node on the Node-RED flow in the backend. The cocossd node detects an object containing the image data, then the text node receives the result text and displays it on the dashboard UI.
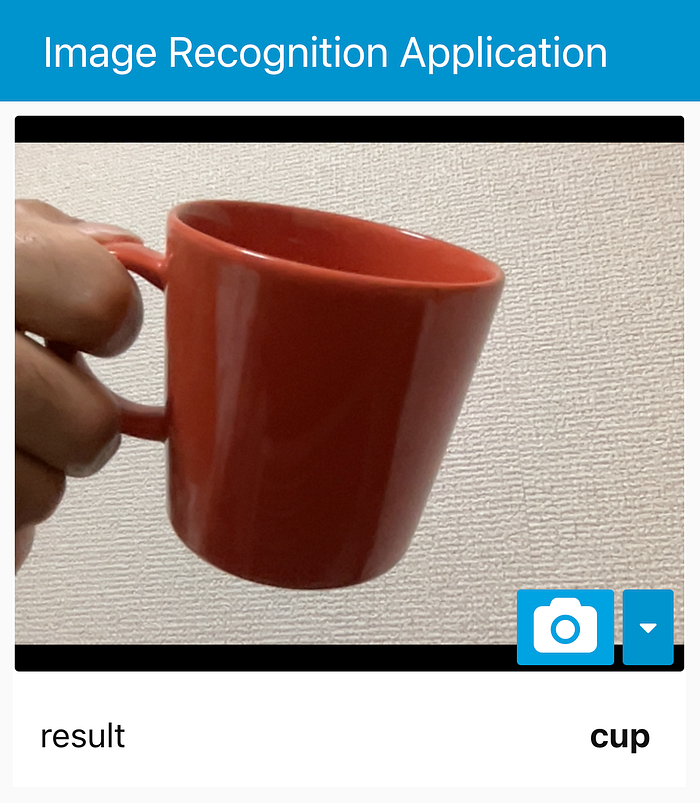
In this case, the photo contains a cup. Therefore, the result text was “cup” correctly.
Adding a function to annotate the image
The cocossd node has an additional function to create an annotated image with a transparent orange rectangle. To implement this function in the flow, simply add the change node between the cocossd node and the webcam node as shown in the following screenshot.
The cocossd node will pass the message containing an annotated image in the variable msg.annotatedInput to the connected node. On the other hand, the webcam node displays the received image data via msg.payload. So the change node needs to convert between these variables. The following assignment in the change node property UI sets msg.payload to msg.annotatedInput on the change node's node property UI.
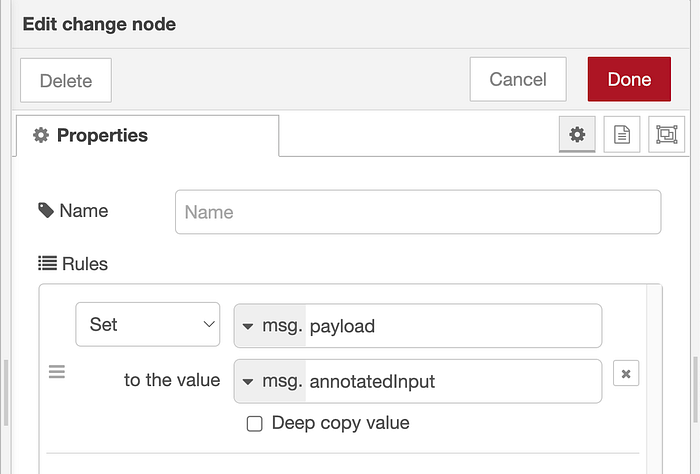
By default, the “to the value” field has a string type whose icon is “az”. Therefore, you need to click the pull-down menu and then select msg. to change the type to the received message.
Testing annotation behavior on the dashboard UI
After deploying the flow using the deploy button in the upper right, you can use the image recognition application on the dashboard, the URL of which is the same as the previous operation. In the application, the camera UI component overwrites the real-time video with the annotated image after an annotated image is generated by the cocossd node.

As you can see in the screenshot, the cup in the image is annotated by the transparent orange rectangle. With this functionality, application users can easily understand where the detected object is located in the image.
Preparations on GitHub
In this section, we will prepare both an access token and a new repository to upload the flow to GitHub. If you do not have a GitHub account, please sign up for a new account using the following URL
Create a personal access token
To generate an access token, please open the following URL
https://github.com/settings/tokens
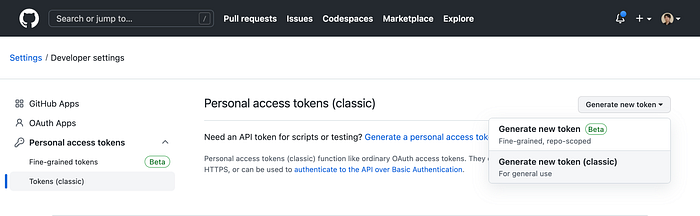
On the page to create a personal access token, select “Generate new token (classic)” from the pull-down menu at the top right.
After that, the new access token settings page will appear.
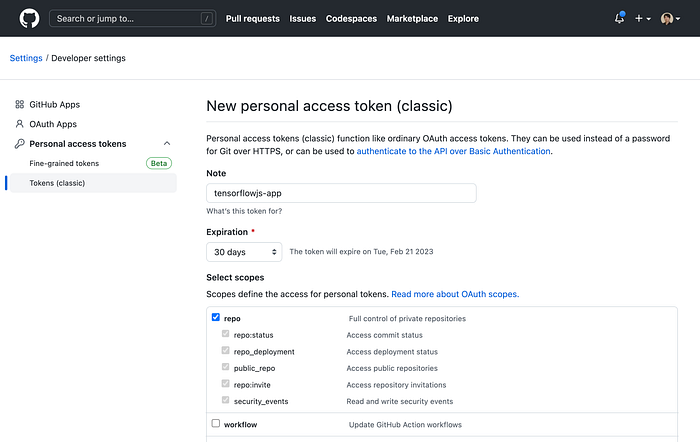
- Note: tensorflowjs-app
- Expiration: 30 days
- Select scope: repo
In this input form, enter the note and the expiration period as you like. The important configuration is the scope in this form. In this tutorial, select the “repo” checkbox for the scope to be able to upload artifacts to the GitHub repository. After clicking the green “Generate token” button at the bottom of the form, the new access token will be issued on the next page.
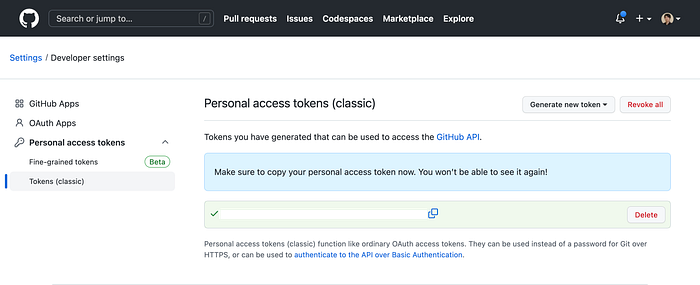
On the final page, copy and paste the access token into a text file using the copy button next to the access token text. To connect to the GitHub repository from the flow editor, many Node-RED users tend to encounter login problems when they mistakenly use a GitHub username and password instead of the access token. The reason for this issue is that as of August 2021, GitHub only accepts access tokens instead of passwords. Due to this change in authentication method, users will need to create a personal access token in advance to access the GitHub repository.
Creating a repository on GitHub
Next, create a new private repository on GitHub using the following URL.
And then fill in the repository settings form like this.
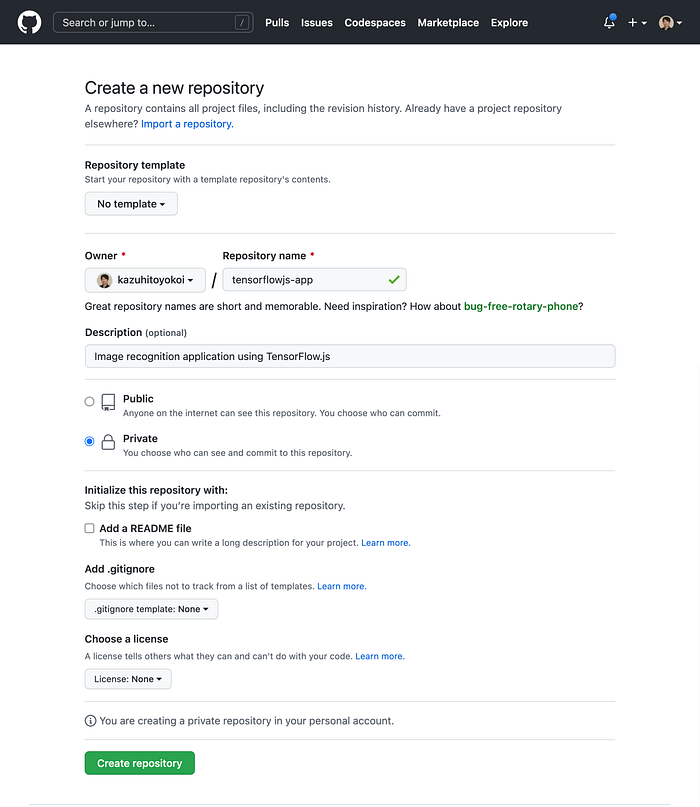
- Repository name: tensorflowjs-app
- Description: Image recognition application using TensorFlow.js
- Type: Private
The first field is the repository name. To be the same as the project name, use the name you entered in the “Create project” dialog. The second is an optional input to explain the repository. For example, type “Image recognition application using TensorFlow.js” in the text box. The third repository accessibility selection should be private because the credentials in the current project are not encrypted. If you have selected the public type for the repository, it is dangerous because the credentials are accessible to anyone on the Internet. The other settings should be the default because these settings affect file creation in the repository. If you accidentally change the other settings, the LICENSE, README.md, and .gitignore files will be committed to the repository with the first commit. In this case, the two commit streams will require operations on the flow editor to merge the commits. To avoid a complicated situation, the repository should be empty in this tutorial. After clicking the green “Create repository” button, the empty repository will look like this.

The empty repository shows the repository URL in the text box. Use the two rectangle buttons next to the URL text to copy the URL to the clipboard. In this case, I copied the repository URL “https://github.com/kazuhitoyokoi/tensorflowjs-app.git" to the clipboard.
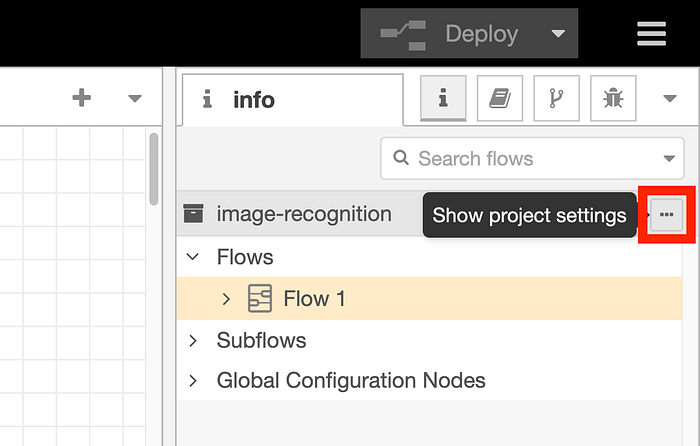
Project settings on Node-RED
Next, we will configure the project settings in the flow editor. Click on the meatball menu (…) with “Show project settings” as a tooltip.
There are three tabs in the project settings interface, as shown below.
- Project:
The Project tab is the interface for entering the application name, application version, and documentation. The application name and version are used fornameandversionsections in the package.json file. Below the top horizontal gray line is the documentation area for the application. Once this documentation is created, it is saved as a README.md file in Markdown style. - Dependencies:
The Dependencies tab is the configuration UI for specifying node modules that the flow uses. This information is for thedependenciessection of the package.json file. - Settings:
You can configure file settings in the repository in the top field of the settings tab. Generally, there is no need to change the settings related to files in the repository, but you can change the flow files or encryption settings if needed. Below this field, you can also set the remote repository. The remote repository setting is often used to connect to the repository on GitHub.
Let’s start by writing the details of the application in the README.md file.
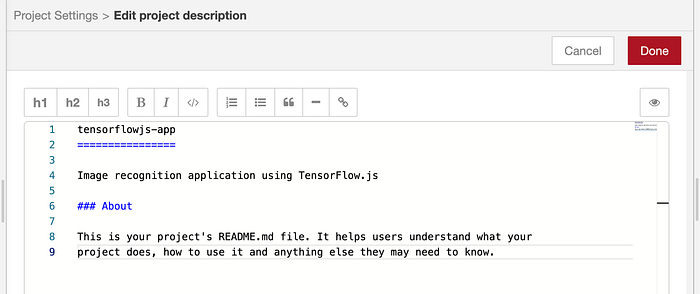
Documenting the README.md file
In the first step of the project settings, we will use the Project tab. Click the Edit README.md button to open the project description.

On the Project Settings UI, you can write the details of the application using the Markdown format.
Above the text area, some buttons support the customization of the Markdown document. For example, you can make the selected text bold or italic by clicking the B and I buttons, respectively. While editing the text, the preview UI, which can be enabled by the eye button, is also useful to check the actual document converted from Markdown.
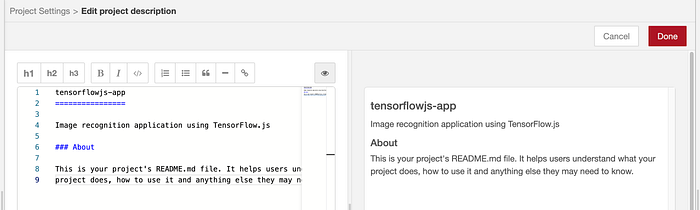
When the documentation is finished, press the “Done” button to save the contents to the README.md file.
Adding dependency node modules
The dependencies tab lists the node modules in the flow.
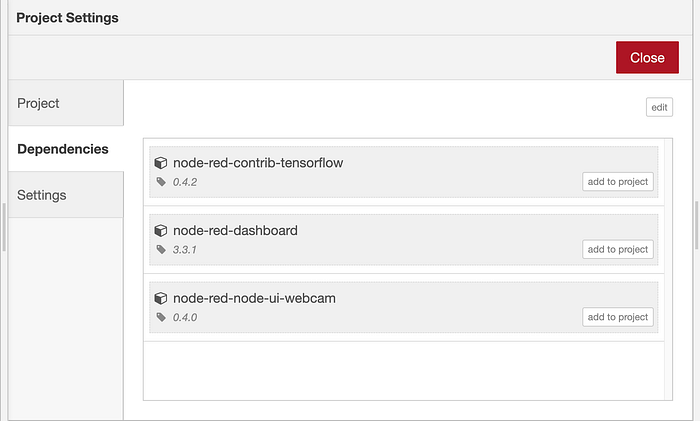
Clicking the “add to project” button will write the required node modules to the dependencies section of the package.json file. This information can be used when other flow developers import the flow and then install the dependencies.
Git remote settings
The settings tab has the UI to set up the remote repository on GitHub to be connected through the Git integration feature. First, click on the “add remote” button for the remote repository setting. After that, a new input field will pop up below the button you clicked. In this field, paste the repository URL you copied from the empty GitHub repository.

In the case of the above screenshot, “https://github.com/kazuhitoyokoi/tensorflowjs-app.git" was used as the repository URL.
Uploading the project to GitHub
In the final step, I will introduce the detailed procedures for uploading the developed flow from your flow editor.
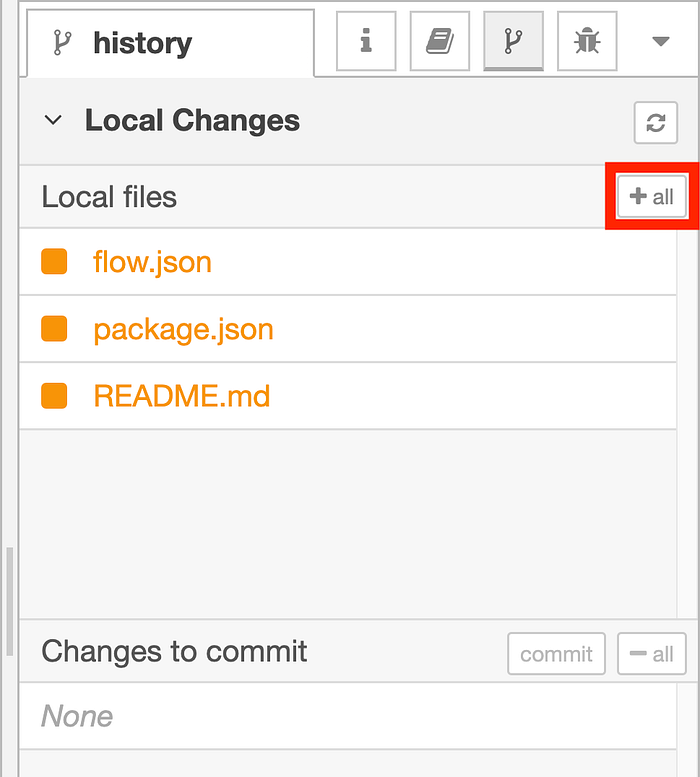
Adding a commit
Before uploading the flow, you need to add a new record to the local history of the flow. These operations correspond to the git add and git commit commands in the general operations of the Git command. In the history tab of the flow editor, click the `+ add’ button to add the updated files, such as flow.json, package.json, and README.md, to the commit-ready stage.
Next, click the “commit” button in the “Change to commit” section, and then type the commit message in the text area. In this case, the commit message is “The first commit”.

To apply the commit, click the “Commit” button below the text area in the last step of the operations for the local repository.
Uploading artifacts to the GitHub repository
Let’s move on to the process of pushing artifacts to the GitHub repository. By expanding the “Commit History” you can see the commit history. To synchronize the artifact between the local repository and the remote repository on GitHub, click the button with the opposite icon next to the text “Branch: main”.
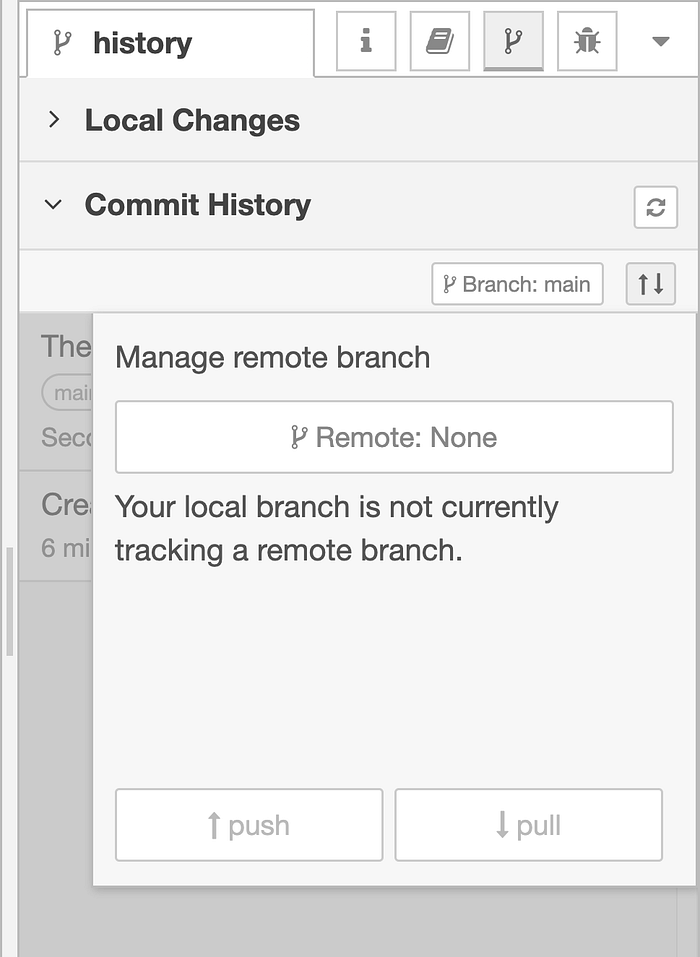
After clicking the “Remote: None” area on the pop-up dialog, the notification dialog is displayed.
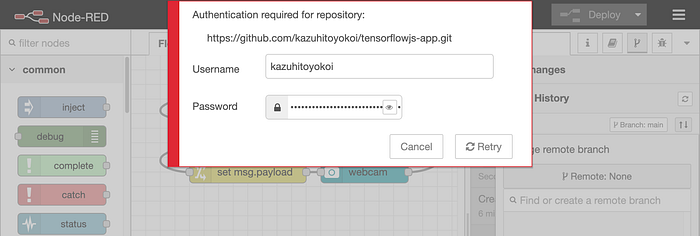
For these text inputs, enter your GitHub username and access token as a password. You are now connected to GitHub. To create a new branch, type “main” in the text entry under the “Remote: None” area.
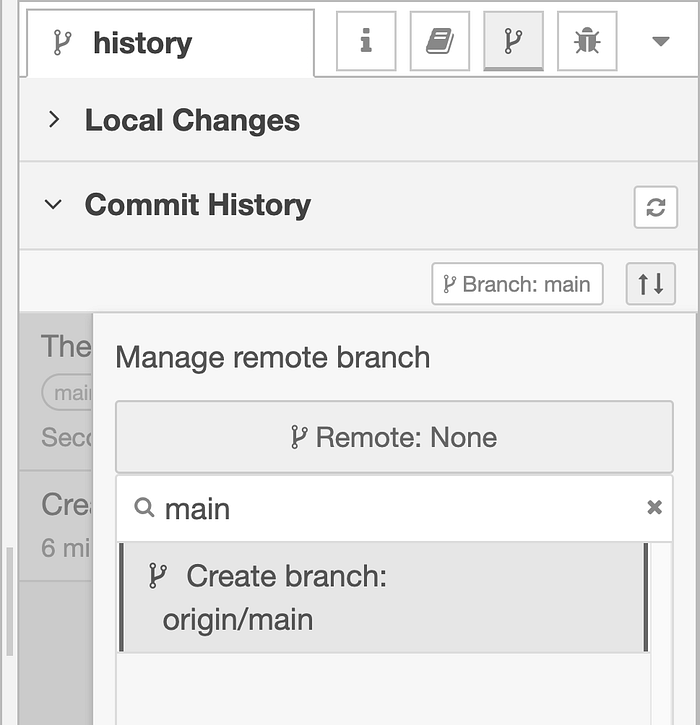
Then click on the “Create branch: origin/main” button, which is created by text input. The final state of the dialog, it is ready to upload the artifacts to the GitHub repository.
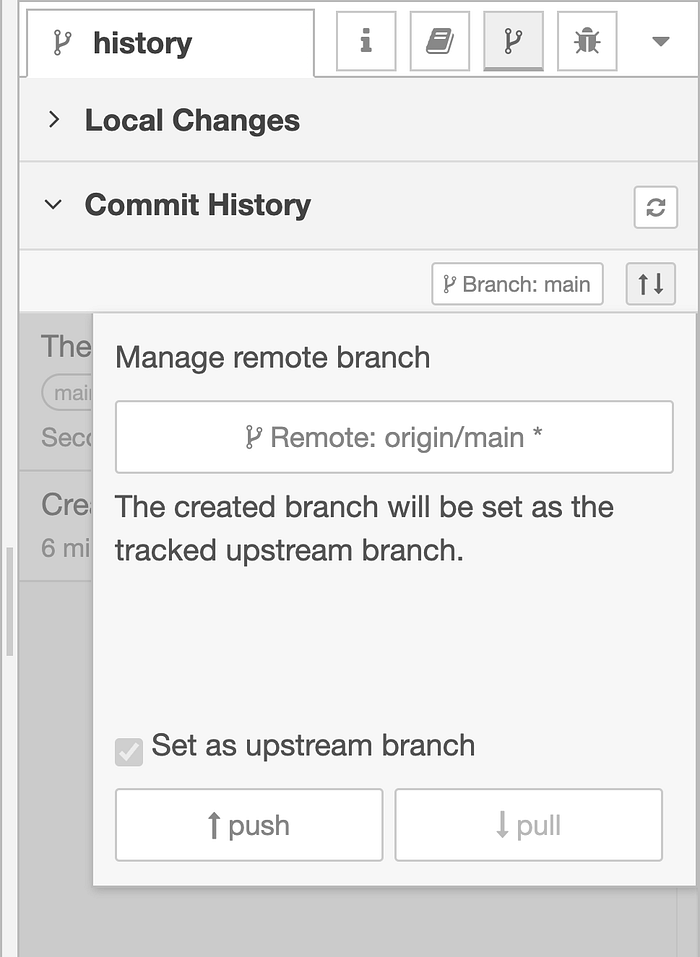
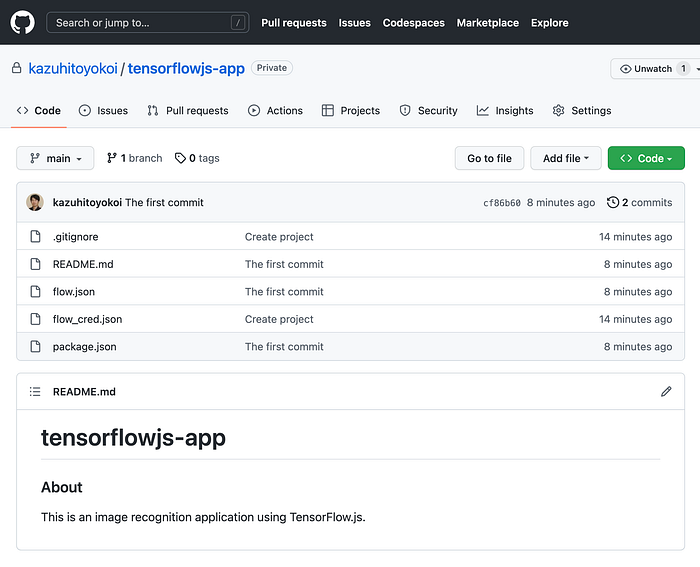
The last step is to click this push button. After the upload process using the internal git push command, you can see the updated repository on GitHub.
Conclusion
In this article, I have explained how to develop an image recognition application using Node-RED. Using the TensorFlow.js node and the Node-RED dashboard nodes, anyone can quickly build an application within an hour. This article also introduced the steps to create the flow document and upload artifacts on GitHub. In addition to simply backing up the artifact, the Git integration is also suitable for sharing the flow with other flow developers. The reason is that the GitHub repository has a flow file and a README.md file with a developer-friendly Markdown document, and a package.json that contains dependency information. After sharing on GitHub, other flow developers can easily check the contents and download the flow to their Node-RED environment.
For advanced cases, in terms of running applications in edge environments, this functionality will be useful to distribute the same application flow to multiple edge devices around production lines in the factory. For the cloud environment, it is also possible to deploy the flow to the PaaS environment that anyone on the Internet can access. In the next article, I’ll write a new article about edge distribution and cloud deployment of Node-RED flow.
Reference
This article used the tutorial idea in the following content using Git integration of the image recognition application.
Node-RED AI Photo Booth Workshop: https://knolleary.net/node-red-workshop-photobooth/index.html